Have you been noticing photographs of buildings and castles with dark clouds over them and with so much of detail that they look unreal? Or have you seen photographs with extraordinary color detail so that every speckle of dust stands out? Well if you have wondered how those effects were achieved, then this small introduction to HDR is for you.
 HDR is the acronym for ‘High Dynamic Range’. To understand HDR, first lets understand what a Dynamic range is.
Dynamic Range is the ratio between the largest and smallest possible value of a changeable quantity. In photography, Dynamic range is calculated as the range of luminescence of a scene being photographed. Therefore it is the range of light-ness that a given camera film or a digital camera sensor can capture. So the dynamic range of a camera defines the amount of luminescence that will be present in a photograph captured at a given exposure.
The Dynamic range of a digital camera is much lesser than that of a human eye, and even lesser than a film camera. As a result, the photograph of a lush green field with bright orange sunflowers may not look as bright and breathtaking in the photograph as they may have originally looked with naked eyes. This is because the range between the lighter and darker areas of the photograph is not very high. It is at this juncture that we think about HDR. If you still need an inspiration, have a look to the left and appreciate the beauty that comes with detail. Lets move on.
What HDR does to a photograph is that it tries to overcome the limited dynamic range of a camera. In an HDR photograph, you are able to see more depth of luminescence and hence a more vivid range of light. Every single instance of brightness and darkness come out and holds on its own. Thats where the magic begins.
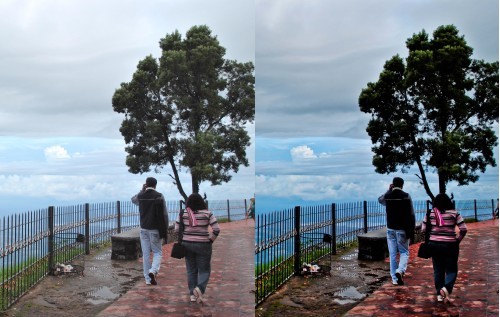
Lets have an example. Have a look at the set of two photographs given below:

Normal Photograph

When taken in HDR
This is the most subtle use of HDR to bring out the details, but do you notice the difference? If you had blown up these photographs bigger, the difference in details will be even more glaring. The lines are sharp, colors are brighter and the overall image seems to come sharper than before. HDR can be used to bring even more dramatic changes to photographs.
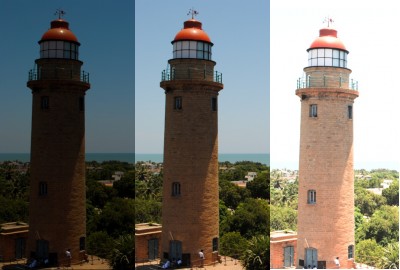
Another example here:
How to HDR?
HDR is more of a Post Production thing than the actual taking photographs itself. To create an HDR, photographers use a method called bracketing, which is, superimposing several images one over another to get the desired image. To do this, you need to take several shots of the same frame at different exposure levels. Lets say, you fix your tripod, mount the camera and take the photographs with Exposure Compensations of -3, 0 and +3. You can also take -3,-1,0,+1,+3 for a more complex one. So at the end, you will have 3 or 5 photographs of the same frame with different luminescence. If your camera has Auto bracketing then you can also shoot in Auto bracketing mode.
Next step is to merge the photographs into one. The most popular software that does HDR merge is Photomatix Pro. The sowtware is a paid one but a free trial version is available with watermark. You may also need Photoshop. A RAW image may not be required for this. Working on the tool is simple, it basically merges all your photographs to get a single HDR, you can learn more from its User manual.
HDR from a Single Photograph
If you use Adobe Lightroom, you can also create HDRs from single RAW/ JPG photographs. All you need to do is, install HDR Presets from websites like Presets Heaven and then apply them to the photographs with some tweaking here and there. However, from my experience I have seen that the quality we get through this way is not as good as the traditional way.
So this was all I had to say about HDR for now. I will be updating this post as I gain more knowledge in this area, hope the amount of information I have put here will be good for starters.
If you want more inspiration for HDR, you can have a look at the Flickr photographs here.
If you have been taking HDR photography, it will be great to know about your experiences and have a look at your works. Please do share.


Cameras confuse me so much (I am not a photographer per se)…but got to understand some basics today from your post–now I will go and show off to my fellow camera illiterates:):)
Thanks Bhavana, Cameras take some time to be deciphered but once done, they are so much fun 🙂
HDR is kind of overdone. It requires a real eye and madness to get it right. Mostly I just see over-processed amalgamation of pics. It’s sad how in the excitement on new technology / technique people forget the one thing a photograph is supposed to be, good looking.
I could not agree more. HDR has been done so much recently that its becoming a cliche. However, I believe that if people keep it subtle, without going over the top, they can produce beautiful pictures by the help of HDR.
Nice!